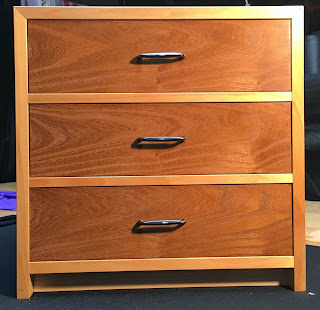
Small Mulberry Cabinet
The usual procedure for projects like this is to make the cabinet first and the drawers second. This one was done in reverse, largely because I was eager to see how mulberry and pawlonia worked in making drawers and not so eager to figure out some other wood with which to make the carcass. Drawers of these woods are common in Japan but I have had no end of blank looks and rolled eyes when I ask lumberyards if they have either. So, if you can't find what you want locally, seek it elsewhere.
This mulberry came from a tree in upstate New York, was sawn into boards by a local sawyer, nobody wanted it so it sat there air drying for a couple years until my "agent" there got it for a fair price. However by the time it got to California in a small package, it was pricing out close to pre-ban Brazilian rosewood. Well I did not have much of it, but enough for some small projects - or parts of small projects. US mulberry is morus rubra (red mulberry), a native of many of our central and eastern states.
The pawlonia (kiri) was given to me by a sashimono maker in Tokyo when I visited his shop a couple years ago and told him how difficult it was to find the wood in the US. His came from China but he had a high opinion of it. Compared to the mulberry, the kiri is the ideal travel wood - light like balsa wood, absorbs shocks well.
For the rest of the project I used some older quarter-sawn Port Orford cedar that is nice and stable. It is not that hard, so it will mar if the maker or user is not careful, but it will hold up, smells good, and is easier to work than the maple in my last project. That is important because other than resaw, this too is a hand tool project. With no glue other than for panel glue-up.
Lastly, the drawer pulls were some I bought at a shop in Tokyo - mentioned in a prior blog post. They are silver plated cast brass and lend a nice look to the piece. Hopefully they draw attention away from some of the the flaws...
OK, resaw your wood, pay attention to which pieces are adjacent to which, plane it all flat and parallel to 12mm for the main case, 9mm for the 2 drawer dividers, and 6mm for the back - or whatever dimensions you prefer. Point is to glue it up and plane it to consistent thicknesses that will look well, join properly and remain flat.
The joint for the dividers that slot into the sides is worth a mention. The idea is to make sure the front of the shelf does not move over time. That small tenon in the front locks the front in place, but the back of the shelf is free to expand and contract in the long mortise. So that front mortise and tenon should be a precise fit.
The back panel is the last piece put into the assembly before the top goes on. It should not rattle but should not need to be hammered in. Tapped in is ok. This panel fits into a 6mm deep groove all around so it can be pretty thin.
And then you put the top on. You will need a block of blemish free wood softer or the same type as your case. Then the hammer comes out and you work along both joints back and forth to seat the whole lid slowly and evenly. As you approach contact with the rear panel, be sure to guide that into the groove as the top comes down.
The key to this type of cabinet build is to remember "tails on top". That way, the hidden dovetail joints at the top of the cabinet will allow the top to be put on last, after all the dividers, sides, and back panel are assembled. It is a major moment of truth when you tap down the top into final position. I do not pre-fit all the parts. It is stronger if you only assemble it once. Takes practice and obviously I am not there yet, but you can get there.
So the last parts to go into this project are two stringers that cross the bottom and are used to tie the two sides together. These strips are dovetailed at each end and slide in from the bottom to hold the sides together. This is my idea and I am not sure it is so swell, but you may have a better one. I might add a third stringer next time.
The second moment of truth on this project was testing if the finished drawers were going to fit the case. I was careful with measuring and cutting and the drawers fit pretty well. Not airtight, but not sloppy.
And finally, as a finish I used multiple coats of rubbed on Watco Danish Oil. One coat was applied with 500 grit silicon carbide wet/dry sandpaper and then rubbed off. That left a silky finish on the planed surfaces. The interior I did not finish as I wanted the cedar aroma to remain.
OK, in case you want to see the whole process done by someone who actually knows what he is doing, here is a youtube link. The video may be in a few parts. The woods he is using include two types of mulberry (kuwa). The highly figured parts are made of the precious shima-guwa, figured because it comes from a windblown island (shima).
Edo Sashimono video or Edo Sashimono video, Kimura Tadashi


Comments
Peter's NY agent
JP