Coffee Shed Stabilization

In the Kona region of Hawaii Island (aka The Big Island), enterprising families a couple generations ago (most of whom were of Japanese ancestry) were often engaged in various home-based businesses, including growing and processing coffee. Part of the coffee processing for many farmers was the drying of coffee beans to yield "parchment" which was then sold.
 |
| Parchment |
The way coffee was most commonly dried was on the raised platform of a drying shed - locally known as a hoshidana - which is Japanese for drying shelf or platform. These sheds were almost as numerous as coffee farmers but over the years many of the hoshidanas have been torn down or fell down. This is a great loss, as the hoshidana is a showcase of thrift, ingenuity, and mechanical wizardry and a testament to the dedication of the coffee farming families that operated them.
So, what distinguishes a hoshidana from a typical farm shed? First, at the top plate level there is a drying platform that covers the entire shed area.

Next, the roof assembly (trusses, purlins, ties, corrugated roofing) is on wheels that ride on steel pipe "tracks".

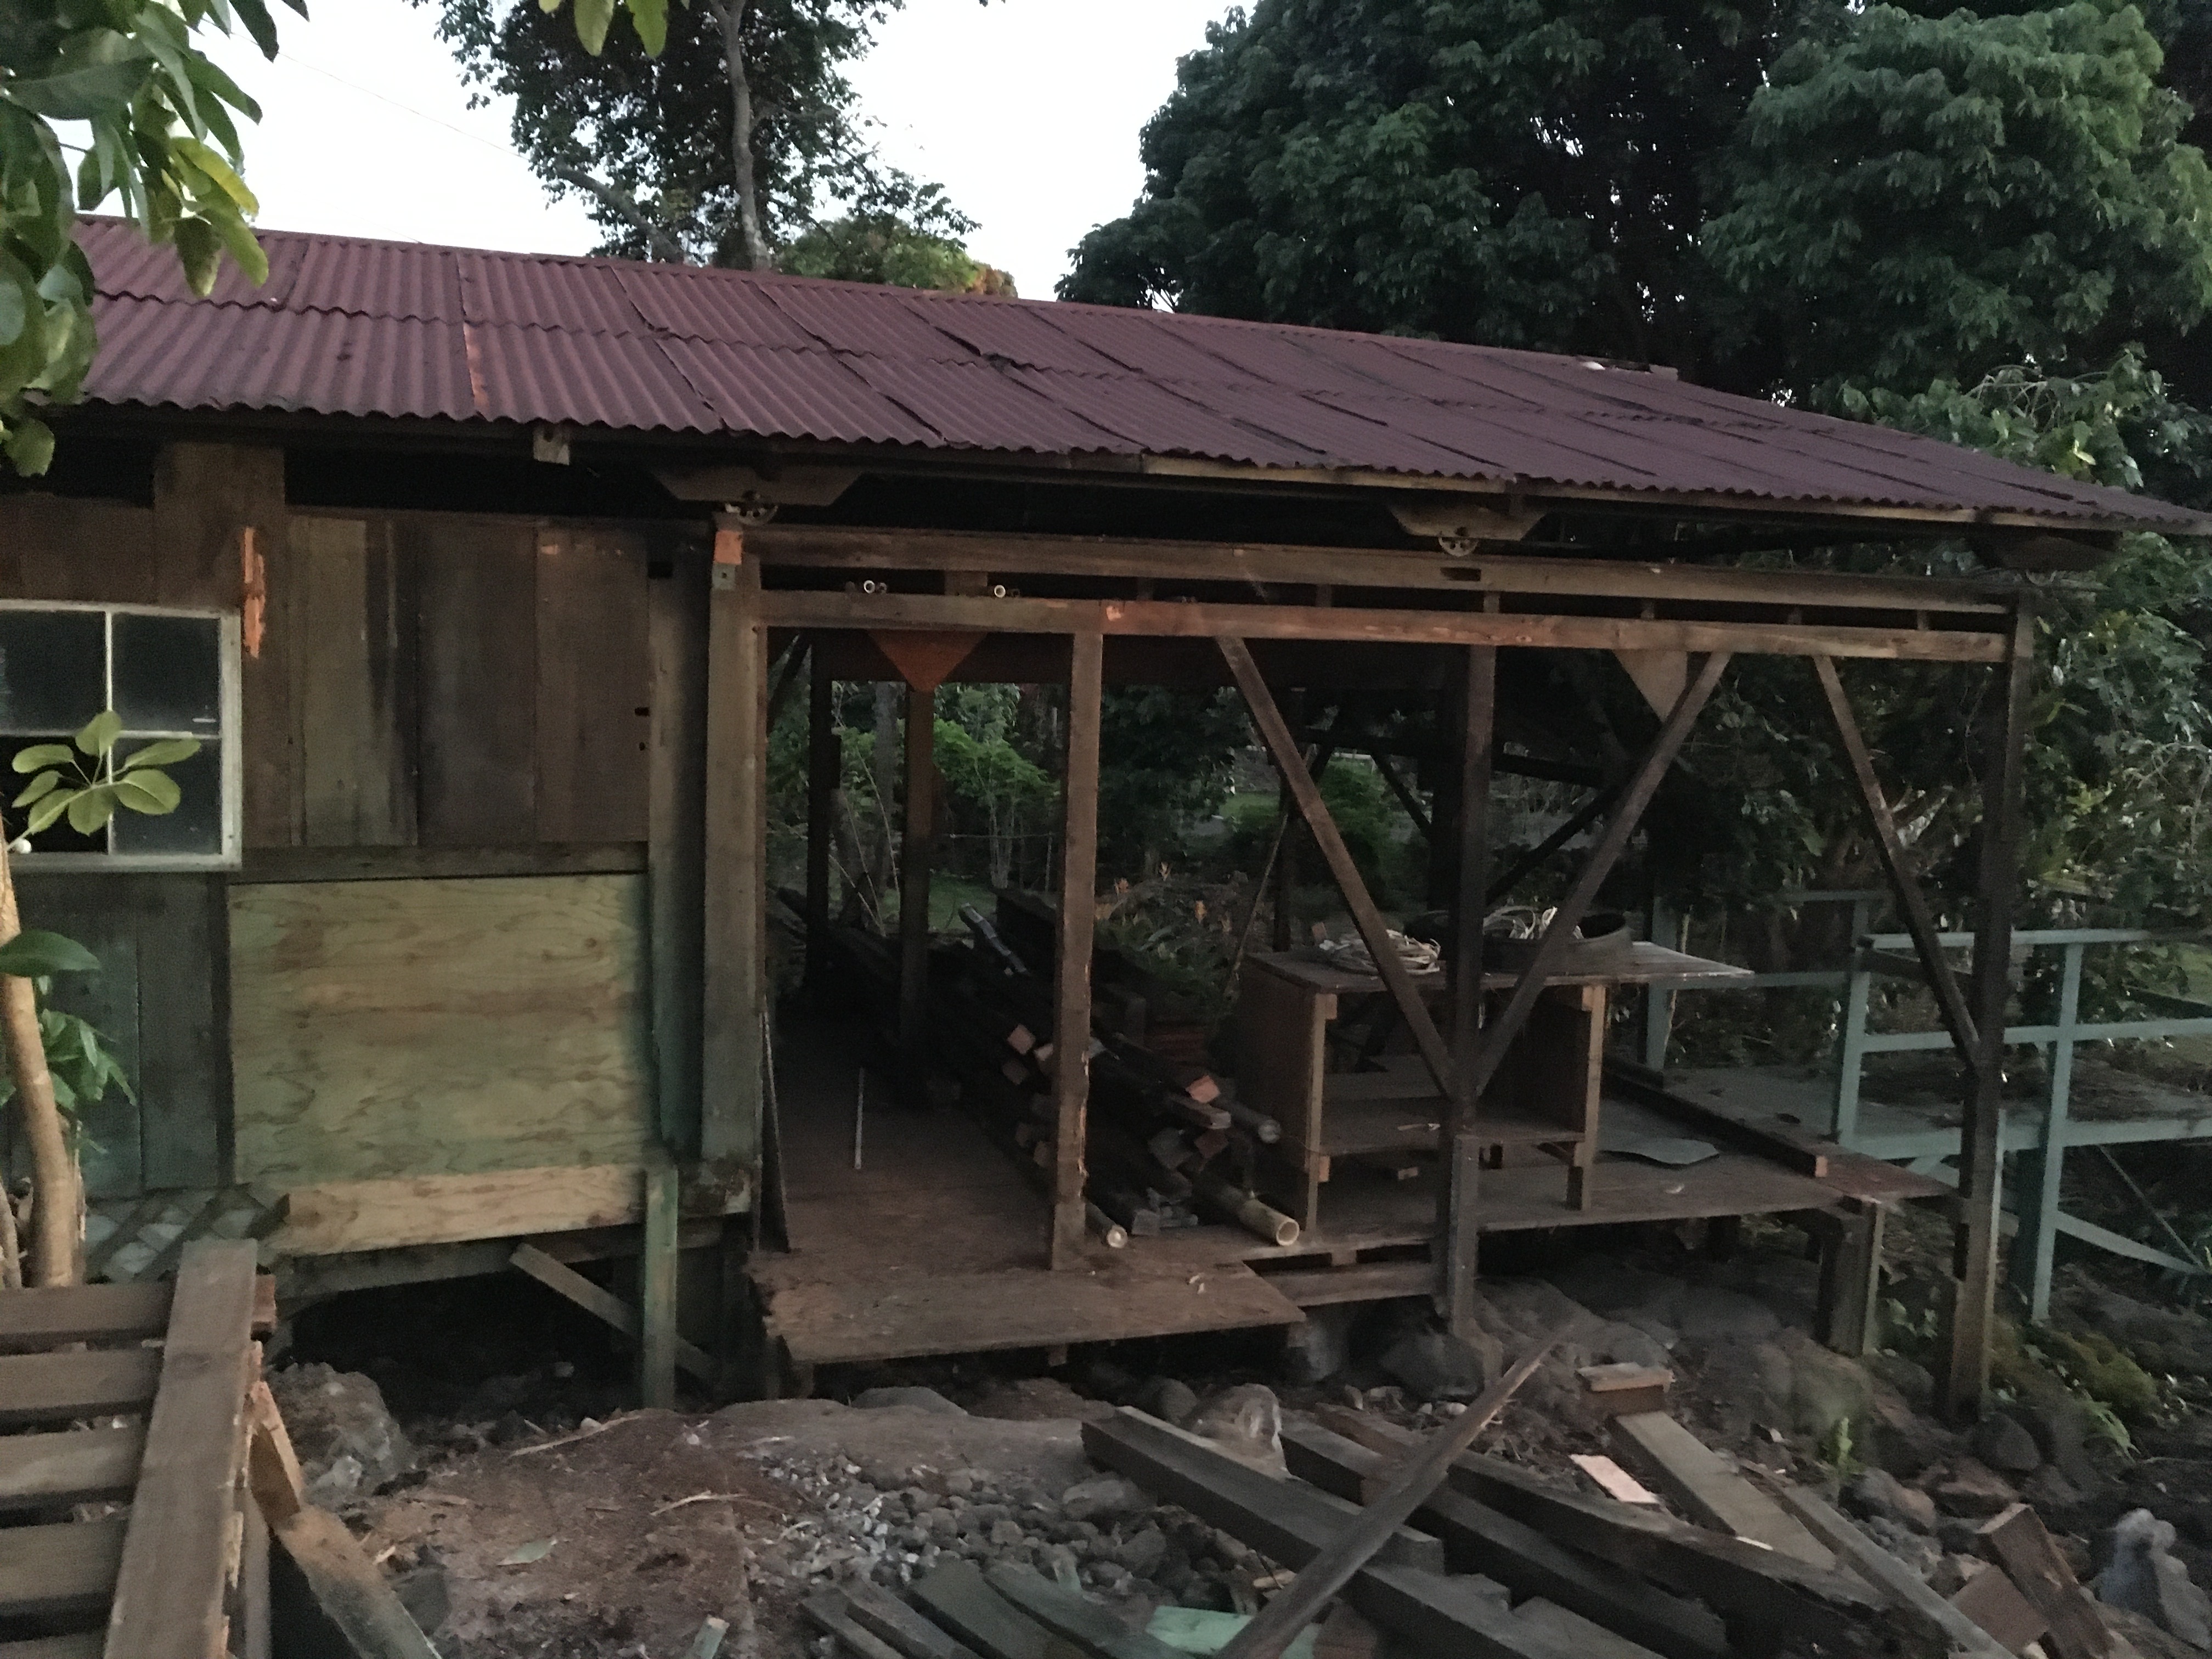
Lastly, there is an adjacent open framework that the tracks extend onto so the roof can be pushed out onto it, exposing the drying platform to sunlight. But, as you can see above, that framework is long gone on this hoshidana.
But here is what it used to look like when operational - sometime in the 1960's. Note that the roof is rolled off (right) onto the framework. The entire deck is loaded with drying coffee.

The hoshidana was part of a system that takes coffee from the just picked "cherry", through pulping (peeling off the fruit surrounding the coffee beans), fermenting (getting the slimy mucilage off the beans), sorting and drying - often via a complex mechanical handling system powered by an internal combustion engine or electric motor. Once the coffee was up on the drying platform somebody had to tend it by raking it regularly to better dry the coffee - or pulling the roof back over the drying platform if it looked like rain - which is a daily occurrence here. This tending job often fell to the farmer's children and was a common after-school activity for many. The local high school even operated on the "Coffee Schedule" so kids could help with the harvest in the fall months. Coffee was the primary industry in Kona and all hands were needed to pull in the harvest.
_________________
In this post I am writing about my experience stabilizing/repairing the hoshidana that stands on our property in Kona. It was built circa 1939 and used for coffee processing until about 2005. My efforts are not a restoration project, as that would pretty much require an outright rebuild because every piece of wood in the shed has suffered termite damage or rot to varying degrees. I can't afford to do such a thing, nor did I want to. I wanted to preserve the layout, the outward appearance (rustic) and overall dimensions but replace the most damaged wood, reconfigure doors and windows, make it safer, and give it more years of usefulness - as a storage shed and covered work area. We do grow coffee but not a volume that requires a drying shed.
This hoshidana (and therefore the drying platform) is 20' x 30' with only half of the structure enclosed beneath the platform. The open end (west) is a maze of posts with a work platform. Originally there was a 12' x 12' pulping shed attached to one side of this open end, but that was removed as was the original adjacent framework to support the roll away roof. In place of the original pulping shed was a later lean-to shed that was in very bad shape and had to be demo'd to make way for a driveway. But the hoshidana roof remained on steel wheels that sat on steel pipes. It just had no frame to roll away on to. So if it ever rolled anywhere, it would come crashing down. Not a comforting thought.
 |
| Yikes! All 4 corners about the same... |
About the shed:
Here are some of the characteristics seen in our shed specifically, but these are typical of early-to-mid 20th century structures found across the islands.
1. Constructed of old growth Douglas Fir (DF) with siding of what looks like western red cedar (WRC). Some of the wood is marked AMFAC KAILUA, which is short for American Factors, one of the large (controlling) diversified companies involved in the land, sugar, pineapple, retail, and apparently building materials trades. There was no real dimensional lumber source in the islands, so most construction lumber was imported from the West Coast.
2. Single-wall construction - a Hawaii specialty that was widely used in plantation era houses and structures. No internal wall framing (no studs or posts) supporting the walls in the enclosed half of the shed. The vertical exterior siding (usually 1 x 12" DF, WRC, or redwood on some earlier structures) serves as the exterior and the interior walls. Early buildings just had siding butted edge to edge. Later ones may have used similar siding that were tongue and groove. But my shed? Just 1x12 WRC (mostly) planks with about 1/4" gaps between.
3. Corrugated iron roofing was the norm. 5 trusses with 10 purlins form the roof and 2 full length 2x4 beams tie the bottoms of the trusses together and hold the 10 wheel block assemblies - one under each truss end.
4. Foundation: A version of post and pier is used. Posts supporting floors sit on (lava) rocks - similar to building methods being used in Japan in the early 20th century. A few concrete piers were added later, but the originals were rocks. We have a lot of rocks here.
 |
| North side, before eave leveling work began, after lean-to removal. |

Trees had grown up around parts of the shed and damaged the roof in 2 places. That allowed a truss top chord to rot, crack and sag and that allowed water to saturate one corner of the platform. The to-be-demo'd lean-to had a very low pitch roof that leaked and poured rainwater onto the side of the open part of the shed, rotting major beams and posts. You get the idea.
 |
| The lean-to before demo. East & north sides. |
 | ||
| Lean-to interior after siding removed, during heavy rain. |

Well, where to begin? Usually it is the roof. But in this case, the lean-to demo work had to take place immediately to allow the driveway work to begin. That job was made more difficult because someone had used decking screws to screw down the real heavy gauge corrugated metal that formed the lean-to roof. You cant pry them out, and most (and there were at least a hundred) would not unscrew. A 6' digging bar had trouble busting the roof panels free. Sometimes it pays to be stubborn. After many trips to the scrap metal drop and the trash transfer station, the lean-to was gone.
One positive of the demo was that under some of the old floor boards in the lean-to I discovered the old growth redwood fermenting tank. That alone was cause for celebration, but inside the tank were many of the old pulleys, belts, sprockets, and bucket chain that were part of that early processing plant - and 3 marine gas tanks that were not. That was a score. The redwood tank itself was a large box formed of splined 5/4 x 12" wide planks but the termites were still active in much of it, after having ravaged most of it. The boards I could save, I did - and I tried hard to save it. Some became replacement siding. Besides the tank, some of the old framing was still usable (with great effort), so I saved those pieces. The lean-to siding was 1x6 cedar fencing that I also carefully removed and used for siding on our other needy shed.
 |
| The fermenting tank discovered. |
 |
| Taking apart the lean-to flooring and tank. A lot of rot. |
 |
| Lean-to gone. Now what? |
Besides the old post replacement work, I rebuilt each wall of the enclosed half with new 4x4's and 2x4's. I added angled braces to improve rigidity of the walls. To get that old look I burned all new wood with a torch to make them blend in with the old wood plus used A LOT of Copper Brown wood preservative on every piece of wood I could. I had ideas of where I wanted to place windows so I planned accordingly when installing girt 2x4's which I planned to use as the lower track for sliding windows - like 2 of the old originals that slid on horizontal 2x boards.
Peeling off the siding in a single-wall building is risky. What little shear strength you had from the intact siding starts to diminish. To minimize the danger of collapse or sagging, before removing siding I first inserted new 4x4 posts (on new pier stones) inside the siding at corners and in between and made sure the top plate (or whole building...) was not going to move when I started pulling siding. So after bracing the building corners/walls in question the basic process was:
1. remove enough flooring to yield working room for new post location. Posts will run from footing stone (pier) up to the bottom of the top plate beam. Lengths will vary since the ground is not level...
2. jack up the top plate until it was level with the completed posts.
3. set the footing stone. Get a measurement for post length.
4. drop plumb bob from mark on top plate where the edge of the new post will be. Mark 4 corners of post on pier stone, flatten with masonry chisel if necessary. Drill a center hole 5" deep, insert 10" rebar pin.
5. Drill bottom of post. Soak in Copper Brown. Drop the drilled and treated post onto the pin. Swing top of post into position, jack up a little if nec, then lower jack to put some pressure on new post, secure the post to the beam, and remove jack.
6. Repeat. 12 posts were added around the perimeter of the enclosed area.
After getting the basic structure framed and leveled I still had the glaring shortfall of siding. I had enough old siding I had pulled out the heap to cover one end of the enclosed area. Barely. The other 3 sides were a patchwork of rotted boards and plywood panels. But then I scored 600 linear feet of used 1x8 (actual dims) T&G fine grained and mostly clear WRC - for $175 at a local salvage yard. Problem was it had nails, screws, dirt, holes, and was painted on one face. Other face was sorta unpainted - good enough for a shed interior.
I tested for lead, not present. I ripped off the splintered T&G edges yielding about 6.5" usable width per board. For length I only had about 85" on each board, since it had been hacked out of the former Kona Village structures with a sawzall or something. But did I mention that the enclosed part of the shed has a low ceiling? Perhaps it was OK for the original users of the shed but at 6' plus I am constantly bashing my head on the lowest beams. However, for my reclaimed siding buy, this was absolutely fine. The original siding was typically 81" though it varied all over, as was customary apparently.
 |
| Some of the "new" siding before cleanup. |
Biggest issue with the new siding was that the painted face needed to be planed down to bare clear cedar in keeping with the original siding. I tried an electric hand planer. Dull in 2 minutes. Tried a 13" planer. Dull in 2 boards. Dug out a No. 6 hand plane with a cambered blade. That was the trick. I still had to touch it up on a grinder every 3 boards and sweat a lot, but the cambered blade got under the dirt and paint and peeled it all away. Plus it left a nice textured surface. Which I next burned with said torch.
 |
| The plane with cambered blade. |
 |
| During planing. |
 |
| After planing. |
 |
| After burning with 3" propane torch. |
With that process and a new battery powered framing nailer (where have you been all my life), I was able to power through the siding job, if a bit slowly. The galvanized collated nails were leftovers from our house build. Result was better than I expected. From the street you see the original siding, but from other sides you see the new siding - which looks oldish. The burning/charring starts with a uniform black surface but that chalks off and over time the lighter wood color returns to some degree.
 |
| South wall before siding. |
 |
| And after... |
Original Wood:
The original lumber was not nominal dimension boards like we have now. A "2 x 4" in 1939 was 2" by 4". But also used here were 2x3's - for purlins, trusses, rim joists, minor floor joists, etc. And 3x4's for beams and posts, and the aforementioned 1x12's - both of rough sawn DF for the flooring and the rough sawn western red cedar siding. And there are 2 specialized pieces that appear to be designed for use in hoshidana's. These are also 3x4's. 30' long 3x4's. They have circular recesses cut into them every 6' or so as if to accommodate the wheels for the rolling roof. So we have to assume hoshidana construction was not an uncommon thing, as these 30'ers appear to be mill-produced. But over the years much of the nice old wood decayed and was propped up, sistered, patched, and replaced with 2x4's and plywood - which itself was already showing signs of decay.
 |
| One of the worn boards on the drying platform. |
Stairs:
Originally there was a staircase going up to the drying deck on the east end. And, since there was a door on the south side about 4' above the ground there were once stairs there. Gone too. And the steps up to the open area platform were rotted and falling apart. So I got some 2x12 from the reject pile at... and made a new staircase to get up to the open area platform (which I had shrunk and solidified). Solid, easier than climbing up the the rocks to get there.
 |
| Old stairs and salvaged lumber from lean-to demo, etc. |
 |
| New stairs made to look old. |
Windows:
OK, I wanted to rearrange window locations to better light the inside and to improve ventilation, appearances, and security. I had these 4 weathered 100 year old former double hung 6 pane windows with wavy glass that needed a couple new panes, a rail replaced, reglazing, and paint. Well, the original paint contained lead. And I soon learned that OLD GLAZING COMPOUND CAN (in this case did ) CONTAIN LEAD. So, encapsulation was the plan. Panes were put in, holes puttied up, a new stile fabricated for one frame, glazing compound laid in liberally, and lots o paint. They are solid now and look OK. All the windows now slide on the 2x4 girt. Old 1/2x1 1/2 lath is tacked on to contain the windows and form the tracks. Some candle wax in the tracks help them slide.
Floor:
The interior 1 x 12 DF floor was warped due to settling/rot, some floorboards had active termites, some were replaced with a patchwork of 3/4 plywood pieces, some were saturated with motor oil. I was able to move some DF boards from the protected west wall to fill in the holes left by rot or removed plywood. For gone or damaged joists (2x3), I found some pieces elsewhere in the building I could move. When I could scrounge no more, I got new or used 2x4's and galvanized hangers and used those or ripped down 2x4's to match the old joists. All wood was carefully checked for termites (and soaked with Copper Brown and termiticide where appropriate) before reinstalling. Floor is pretty strong now and still looks old, as desired.
 |
| Replacing joists, then re-layed old DF flooring. |
Termites:
Further, I treated for termites when I found or suspected them. Borate, Copper Brown, Home Defense, termiticides for active termites, or worst case taking boards to the dump. I even used sheet metal between suspected termite wood and new wood. All new DF on Hawaii is borate treated but the termites still munch through it. The old DF they say was floated in to the beach from an anchored ship in Kailua and that soaking in salt water helped keep the termites away - for a while. But anywhere there is wet wood, there will be termites. Unfortunately we also have the subterranean and drywood termites. Eventually you lose.
Metal:
I was told that "everything rusts in Hawaii". It appears to be true whether it is in the house or outside. So every fastener and bit of metal used in any construction needs to be copper, brass, stainless, galvanized or somehow coated to protect it. Leftover from our house build was a huge roll of Simpson coiled strapping, which I used liberally for most post/beam connections. H2.5A's were used to hold posts to platform joists, some floor joists were added using LUS hangers, bracing was lag screwed to posts and beams. So, I used quite a bit of galvanized steel to make sure things did not shake apart in the first quake. But you know? The original building used none of that. Only galvanized common nails. I reused some of those nails and saved all others because they are much heavier than modern nails and have real thick galvanizing. I spray painted all visible new metal parts flat black to make them less visible.
Original Equipment:
Sadly, much of the innovative coffee handling equipment and mechanisms were dismantled and gone by the time I showed up. But the good thing is that the property had belonged to the same family for 70+ years so some things remained and best of all I could speak to someone who formerly operated the hoshidana and pulping equipment.
From looking at the bits that remained it is evident that there was real ingenuity at work, and done in a very economical way. Machines repaired with household items. Auto parts used to build/repair the pulping equipment. Re-use of lumber, metals, hardware - much like the barns I have examined in New England.
I did have the 100 lb electric motor (vintage 1950's), some heavy line shafts (steel rods about 1 1/4" diameter, various lengths up to 12'), a long chute (part of an oscillating conveyor) and a sorting screen, but that was it until I found the home-made redwood pulleys and stuff in the fermenting tank. Old photos of the mechanisms do not exist, so how it all went together in the old days remains a mystery. Kona Historical Society has their living coffee farm that has similar buildings, as does Greenwell Farms nearby - both worth visiting if you are ever in Kona.
Roof:
Future project, much needed. Waiting for dry season...


Comments