Kikai-jyakuri rebuilds (aka Grooving plane rebuilds)

The kikai-jyakuri-kanna (機械決り鉋 or 機械作里鉋) is a handy style of plane for cutting continuous grooves of widths from about 3mm up to 15mm. Max cutting depth is about 12mm . It is similar to the western grooving planes in function (cuts a rectangular groove), but not in construction. These are (were) typically used for cutting the grooves required to insert thin panels or glass into shoji doors or similar items. It is a special purpose plane that has limitations. The router has really replaced these planes but these are a lot more pleasant to work with and are still available new and used.
 |
| This sole is part of the main body. |
 |
| This narrow sole is brass. |
Japanese books on the subject point out that these planes do not generally leave a perfect groove. They are for cutting grooves that will accept a panel or pane of glass - and they do a fine job of that. They can cut with or across the grain but will take some practice to yield good results. They also have to be setup carefully.
As venerable Toshio Odate informs us in Japanese Woodworking Tools, the name of this plane seems to be partially related to the fact that it is assembled with screws and therefore falls under the broad category of "machine", or kikai (機械) in Japanese. Let's leave it at that, but note there is a version of the plane that uses square wooden pins (dabo) to hold the fence to the body and provide adjustment by friction.
1. blade width
2. body construction
3. chip clearing path
In general, there is a fixed sole, two nicker blades, a main blade, a body, and an adjustable fence. Notably missing is a depth stop.
 |
| Main blade |
Let's start by looking at the main parts:
Main Blade:
Laminated, ura is hollow ground, back end has a hook to it for insertion and removal. Blade bevel is ground straight across, no skew. Sharpen as you would a chisel. There is no chipbreaker on this class of relatively narrow grooving planes. Like some chisels, on the better blades the harder steel (hagane) is wrapped around the edges of the blade to make them more durable.
Nicker blades (2 per plane):
Laminated, ura is hollow ground, back ends have a hook to them for insertion and removal. Each has two bevels that form a point. These blades are thin and easily damaged - during removal especially. A safe way to extract these blades is with a wood wedge tapped in between the top of the main body and the blade hook.
 |
| 2 sets. Left set ura not flat. |
 |
| Narrow 3mm |
 |
| Medium 6mm |
On the narrowest planes, the nickers are one in front of the other (side by side) with the ura on opposite sides. Wider than that and the nicker blades are inserted back to back, touching each other or on planes above 6mm it is typical to find a wooden spacer between the nickers. This is not a wedge, it is a shim or spacer. The nicker blades are tapered and do wedge front-to-back in the body, but they should not wedge tight against the sides of body. If they do, they force the body layers apart - no matter how many screws there are in the body.
 |
| 3mm blade set, one nicker in front of the other. |
Body:

This is usually a stacked shira-gashi (Japanese white oak) assembly, but not always. Some planes have a single block of wood for both the body and the sole, but for most the sole is a separate piece (actually 2). The sole grain direction varies, but angled so the bottom of the sole is end grain is common and durable.
All those screws hold the stack together - but some planes use few screws while others use many. My guess is these bodies are stacked to make the manufacture of the planes easier and cheaper. Makes it easier for us to replace parts, too. I advise you not take out all of those screws unless you absolutely have to. They can be rusted, stubborn, and they shear or the slot gets mangled. If you must, pick a close fitting screwdriver and ease them out by hand.
Shrinkage of the body is very likely. Take a look at this image. The steel retainer plate did not shrink but the wood body did. I removed the plates, clamped the plane body back together, filed the plate edge and flattened it, then re-inserted. The gap almost vanished.
 |
| Before pulling the plate. |
 |
| After removing the plate and some clamping. |

 |
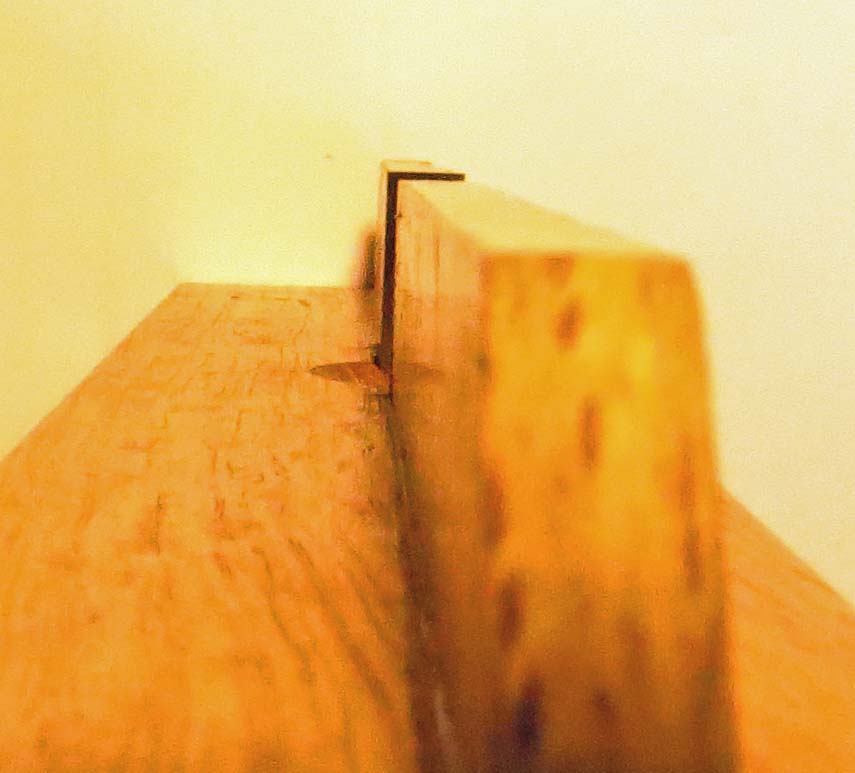
| Place a straight-edge along the sole. This gap is a problem. |

Shaving path:
 |
| Top ejection shaving path example. |
 |
| Side ejection example. |
The above shaving paths each have their pro's and con's. On the top-eject models, the shavings can jam up on the metal plate that retains the main blade. That plate makes an appreciable ledge that cannot be eliminated. The plates often have this (lower) edge ground at an angle to ease shaving escape but that does not solve the issue.
 |
| The plate that retains the main blade can trip up shavings. |
 |
| This sole is separate piece(s) of wood. Screws to support fence. |
Typically (and in all examples herein) the fence is adjusted, supported, and secured by the use of the two long transverse machine screws you see. It is sandwiched between thumbwheels on the inside and wingnuts and washers on the outside. The range of travel is limited to the screw length and the geometry of the L-shaped fence. So there is definitely a limited operating range. The fence can be flipped around to get a bit more span, but again, this tool is designed for grooving stiles and rails of shoji doors, frames, and smaller items requiring panels or glass. Worst case, you could get longer bolts or threaded rod and make what you need.
Initial setup:
When you receive a used plane, expect the following:
1. the body will have warped, thereby putting a bend in the sole.
2. the fence likely warped.
3. all wood probably has shrunken - causing the stack to be forced apart by the main blade and nicker set.
4. the blade and nickers will need work.
5. all metal parts may need rust removed and straightening, etc.
First off, do a careful and full inspection of the plane. You are looking for things like warping, separation of body parts, squareness of the fence to body, cracks, modifications, evidence of prior overhauls, bent bolts, plates or blades, etc. You need to address some critical conditions, others can wait.
Like any plane, start by cleaning up and sharpening the blades. These have to be sharp, square, and clean. I usually just follow the existing bevel on the main blade, but if it is mangled or rusted pick an angle that suits your wood or experience. No idea? Try 28-30 degrees.
For the nickers, even on new planes, the ura will need to be flattened and the nickers sharpened. I have had to resort to grinding them in the worst cases just to reach the newly flattened ura. These things are laminated and very thin, so wet-grind or be careful. The tips of the nickers need to be the intersection of the ura and two bevels. A sharp point is essential and the pair should be the mirror opposites of each other.
In all cases, it is critical that the main blade width and the overall width of the nicker set are within at most about .006" of each other, with the nicker set being the wider of the two.

The nickers sit in front of the main blade and cut sides of the groove before the main blade comes through and peels out the center and forms the bottom of the groove. If the nickers are narrower than the main blade or if the main blade is not centered between the nickers, you will get very ragged groove shoulders that will be visible in your finished work. What I have measured and seen work well is having each nicker about .003" outside the blade edge (.006" total).
 |
| "Thread" caused by nicker not aligned with edge of blade. Tear-out in groove caused by blade being outside of nicker. |
 |
| The main blade out beyond sole. |
 |
| But not on this side. Center it. |
Nickers often get bent during extraction and insertion. You may have to carefully hammer them on an anvil to flatten them out so the nicker set stacks together closely, ideally with no gap the length of the nickers. Often the nickers will be bent out such that the stack (2 nicker blades and a shim if there is one) far exceeds the width of the blade. So before doing heavy grinding or shaving the shim on a nicker stack that appears to be too wide, straighten the nickers, then measure again. Using wedges to extract the nickers will reduce this kind of distortion.
Depth of cut depends on what you are seeing with tear-out (on the groove bottom) and whether you are hogging and in a hurry or down to the last few passes. Light cuts at the end will improve the finish and accuracy but you may rack your alignment in the process. Keep the practice scrap handy. On one plane I have, I can see where someone tacked a strip of wood to the bottom of the main body to serve as a depth stop. That kind of mod is up to you. You can probably figure out a better solution. It took me a while to extract the brad that had snapped off in the hard oak...
These planes are a pleasure to use once tuned up a bit. Look for ones that are not battered, rusted, or missing parts - specifically blades. You can get it working, even if you have to replace some parts but the 3 blade set has to be intact and not damaged. All of the planes I have came off of eBay.


Comments