Tea shelf

This project began as the focus of an 8 week course given by Jay van Arsdale out of Oakland, CA. It has taken a bit longer than that to complete. The basic design parameters (3 shelves, 4 stringers/legs, overall dimensions of about 24" x 24" x 8" deep, in cherry) were laid down by Jay but the final dimensions, shelf spacing, added features, and finish were left up to the students.
I chose to enclose the bottom shelf and use bypassing doors on the front. I also thinned the shelves to about 6 bu (.75 inch) for visual reasons and because they needed considerable flattening.
Once the flattening and dimensioning of he shelves was satisfactory I simultaneouly marked the 3 shelves for length. Then a center line was established on each and then came the rest of the joinery layout.
The layout was the time consumer, as usual. We used a variant of the mitered breadboard joint that had two through tenons that were later wedged to hold the ends in place. The "legs" were to be locked in place by the ends. We made a prototype of the joint to get acquainted with it and that process yielded a bunch of do's and don'ts.
Most critical is getting the miters drawn and transferring the key dimensions onto the end pieces. You have to rely on your layout lines so they need to be thin and accurate and they really need to have tight registration on both faces of each shelf. Errors will add up on this one. It took several hours to layout 3 shelves and the end pieces.
First cut were the end piece mortises. Take care to keep the shoulders sharp and clean on the outside edge of the end pieces because they will be visible.

Next was grooving the end pieces on the faces that would enclose the cabinet ends. This was done with the 2 bu kikai-jyakuri-kanna (grooving plane). People complain that you can't control depth with this plane but for this application you can get good results.

 |
| Setup for grooving edge of end. |
 |
| Rough end pieces for the bottom 2 shelves. |
 |
| Two grooves for the bypass doors, one for the back. Rough. |
From this picture you can see that there is a lot of removal to be done. I tend to prefer sawing to chopping so for this joint I created a couple of saws by using tin snips to cut up a Z-Saw cross-cut blade into a couple helpful shapes. You would have a disaster if you tried using tin snips on anything but a relatively cheap blade. Real ones are very hard and will trash your snips and crack. Impulse-hardened blades (like the Z-Saw) have hard teeth but the rest of the blade is workable.
 |
| Azebiki and modified Z-Saw blade saws. Crude but effective. |
The removal started with ripping all tenons (from face to face only). Then by drilling (4) 5/8" holes through each end of the shelf. 2 for the narrow steps outside of the tenons, and two inside the tenons. Then I chiseled the inboard corners square so as to help saw alignment. Using the narrowest saw above I cut off the rectangle between the tenons. Then used the azebiki to start the crosscuts of the shoulders, followed by the middle Z-Saw above to finish the cut. I marked a depth line on the saw blade with a fine permanent ink marker and cut to it.
With the rough shoulder cuts made I split off the waste until I was close to final tenon thickness. I took time out to make a "tenon scraper" out of a piece of 1" x 1" x 6" white oak (former kanna dai) and a HSS 5/16" square lathe tool bit. By setting the tool bit exposure to match the shoulder depth i could trim the tenon cheeks parallel to the shelf faces quickly and accurately. Cheating, I know, but sawing the tenon cheeks was risky due to existence and proximity of the outboard miters.

I cut the miters with a simple miter jig but you could do it freehand. Just do not leave much material to be pared off later. Ideally you make one final chisel cut of uniform thickness, not a series of cuts to clean up a skewed or jagged saw cut. Since you are sawing the miter over a final surface, use a small strip of wood to prevent the saw from cutting into the face of the shelf if you get careless.
In this case, I did not make the final chisel cuts on the shoulders or the shelf miters until all the rough pounding was done on both ends of a shelf. Once the shelf trimming was done it was time to fit the ends to the shelves.

For the breadboard end miters I created a simple fixture and used a sharp kanna to work towards my miter layout line. I wish I could say I only had to fit and trim once, but it took repeated fittings to bed the ends in. Don't make the fit too tight on the tenons or you will risk damage taking them apart to re-fit. To remove the ends during fitting I used pairs of opposed wedges through the leg holes to work the ends off gradually.
With the shelves mostly ready I moved on to trimming and fitting the sides and doors. These are all 2 bu thick to fit the 2 bu kikai-shakuri-kanna grooves cut previously. On larger shelves of this style the doors are framed on 4 sides. I had to settle for trim on one edge that could be used as a pull. I left the final fit of the doors until after final assembly - they are supposed to be removable.
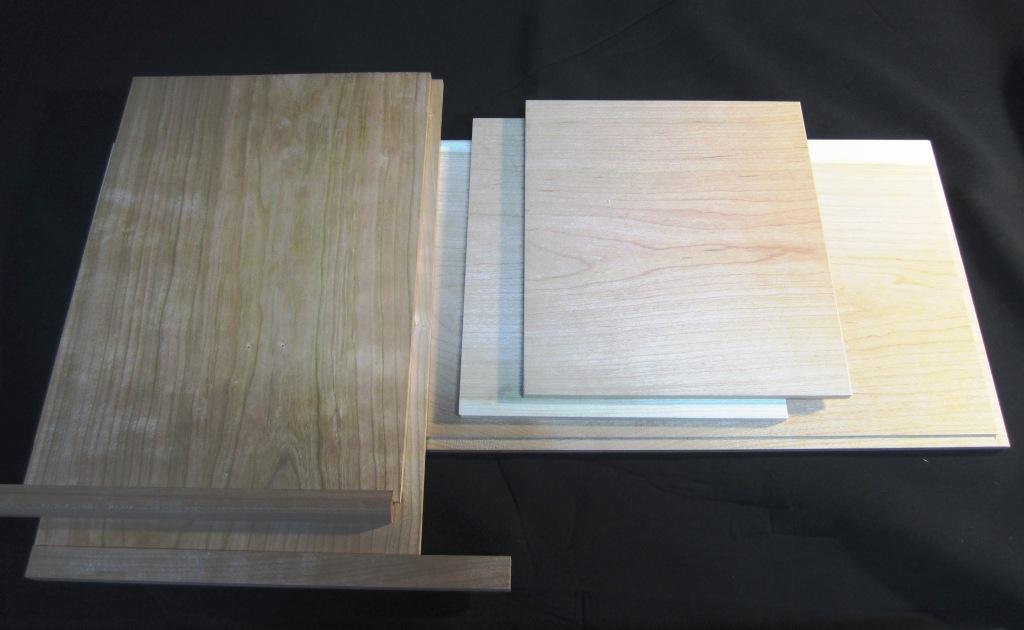 |
| All panels. Doors (left) have the trim pieces. |
 |
| Trim pieces in approx closed position. |
 |
| The East and West planes used to shape the moulding. |
The legs required 2 bu wide grooves for the side and back panels. Since they were stop grooves I manually chiseled them after scribing. The top shelf is held on by dovetailing the tops of the legs. The bottoms of the legs were simply chamfered with a knife. All corners of the legs were chamfered with a men-tori-ganna (面取鉋).

Final assembly:
 |
| All parts, ready to assemble. |
 |
| The sides had to be assembled first. |
 |
| One of the (better) corners after assembly. |
All done:
 | ||
| After final assembly. Time for finishing (multiple coats of rubbed Watco). |


Comments