 |
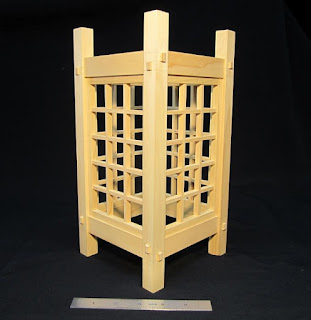
| trial assembly, more to do |
The andon lamp (wood and paper variety) these days is usually powered by a blazing incandescent bulb and is hopelessly tethered to a wall outlet. But the basic forms and materials have not vastly changed and you can get good results with a little bit of experimentation.
Design criteria:
- portable, small hand lantern with a conventional appearance.
- Port Orford cedar (POC) with shoji paper to diffuse the light source
- battery powered.
- low powered LED system so the battery would last and the light would not offend.
I sketched many forms of andon-like lanterns and researched the existing state of andon art on the web. Many great ideas out there - though most include a power cord. Go to http://images.google.com and paste this into the browser and you will find a bunch: 行灯
The wood bits:
This is another handtool-only endeavor. You can save some time with machinery, but we are talking about a lot of small parts so be careful. I used a rip dozuki saw that has a blade .010" thick for the small parts, so there is very little waste and it cuts quickly. Starting with a 2" x 8" rough block of POC one shaku long, I ripped and planed all parts to yield a pile that looked like this:
This four-sided design uses removable shoji panels so the paper can be readily installed initially and, more importantly, replaced later. Keeping the panels visually lightweight took some mocking up.
 |
| Typical shoji construction - on a small scale. |
 |
| The corners only are tack-glued. |
 |
The four panels prior to gluing, plus some tools used.
- 1 bu oire nomi (bench chisel)
- dental tool (mini-sokosarai nomi for clearing small mortises)
- kiwa-kanna (rabbet plane)
- rip (tatebiki) dozuki
- Mitsukawa flush trim saw (no set, used here for cross-cuts and trim)
- dental pick for cleanout of small mortises.
|
 |
| Note the rabbet depths on end of panel - one 1 bu, other 2 bu |
The shoji panels were rabbeted top and bottom across the panel, leaving a 1bu thick overhang across the panel. The top was rabbeted 2x the depth of the bottom rabbet. The rails above and below the panel are grooved with a 1 bu kikai-shakuri-ganna. The top rail groove is 2x deeper than the groove on the bottom rail. This allows the panel to be lifted up enough to clear the shallower bottom groove and then swung out, and then pulled down and removed from the frame - like a full-sized shoji door. When installed, the panel rests fully in the bottom groove, while the top groove is only half filled - so the panel is held top and bottom (only). Keep the tolerances tight on the overhang thickness and the groove so the panels do not rattle around or jump out if the lantern is bounced around.
Coming soon will be the shoji paper install, a handle, electrical, and final trim.


